Newsletter Tool
The Newsletter Tool is off by default. Ask your Vibemap contact to turn it on for your organization.
Build an email-ready calendar block from your upcoming events, then paste it into your Mailchimp or Constant Contact newsletter.
In the sidebar, open Campaigns, then under Share click Newsletter Tool. It appears only for organizations that use Vibemap for events. The page's heading reads Calendar Studio.
The panel on the left builds the block. The right side previews the block inside a sample email.
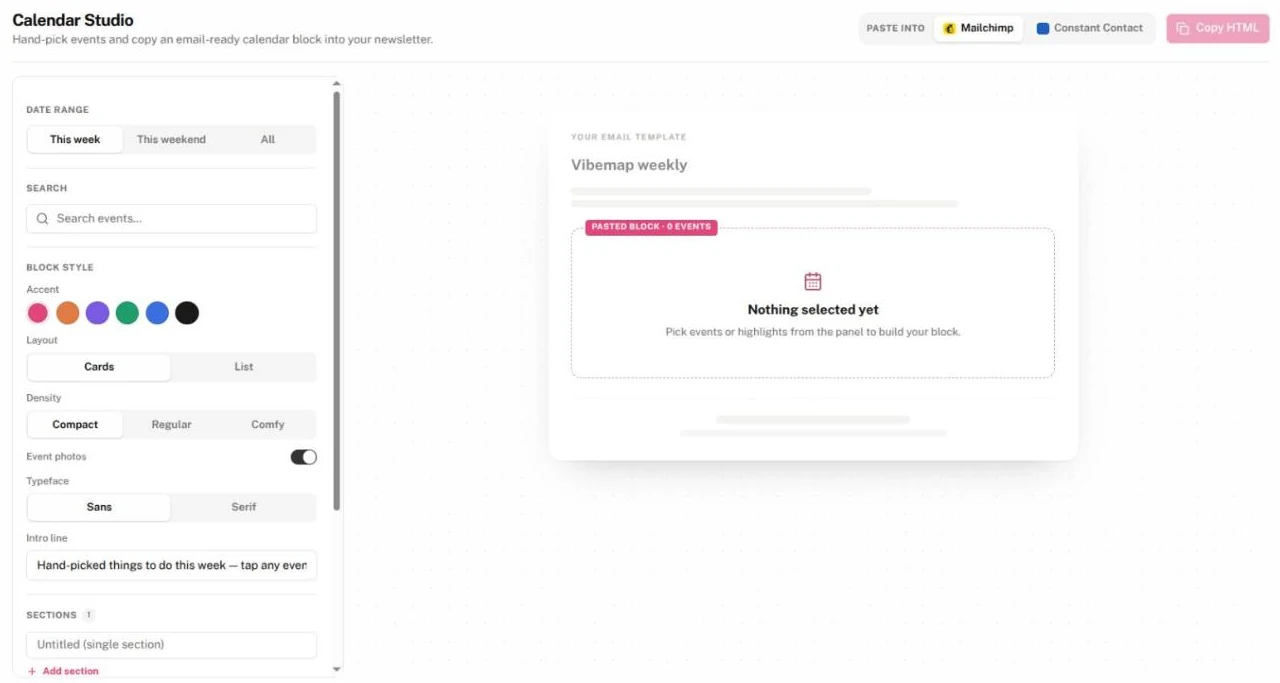
Pick events
The Events list holds your upcoming events, earliest first; past events never appear. The first time it loads, your featured events, marked with a star, are already in the block.
- Under Date range, choose This week (today through the next 7 days), This weekend (the coming Friday to Sunday) or All.
- Narrow the list with Categories, City and Search events…. The count beside Events shows how many match.
- Click an event to add it to the block. Click it again to take it out.
Select all adds every event the filters show. Clear takes every event out of the block.
Each event in the email links to its event page.
Style the block
Under Block style:
| Setting | Choices | Effect |
|---|---|---|
| Accent | Six color swatches | Colors the dates, buttons and section rules. |
| Layout | Cards (default), List | Cards shows each event as a card with a photo. List groups events by day, one linked "Venue | Event" line each. |
| Density | Compact (default), Regular, Comfy | Card size. Regular and Comfy add each event's description. |
| Event photos | On (default), off | Off drops the photos from the cards. |
| Typeface | Sans (default), Serif | The block's font. |
| Intro line | Free text | The sentence under the heading. Clear it to leave it out. |
The block opens with the dates your chosen events span, the heading "This Week on Vibemap" and your intro line. If your organization has a public events calendar, the block ends with a See the full calendar → button that links to it.
Split the block into sections
With one section, the block lists its events under one heading. To group them, such as "Live Music" and "Community Events":
- Under Sections, click Add section.
- Type a name in each section's box. A section left blank is headed "Events" in the email.
- New picks go into the last section. To move an event, choose its section from the menu beside it in the Events list.
To remove a section, click the × beside it. Its events move into the first remaining section.
Add highlights
A highlight is a story card above your events: a photo, a headline, a paragraph and an optional button. Highlights are saved to your organization, so you can reuse them in later sends.
- Under Highlights, click New highlight.
- Type a Headline. Optionally add a paragraph, a Photo (JPEG, PNG or WebP; click Upload or drop it on the box), a button label (CTA label) and its link (CTA URL).
- Click Add highlight.
- Tick the highlight's box to put it in the block.
Click the pencil to edit a highlight, then Save changes. Click the trash can to delete it.
Copy the block into your newsletter
- Next to Paste into, choose Mailchimp or Constant Contact.
- Click Copy HTML. The Hub copies the block to your clipboard and opens Paste into Mailchimp (or Paste into Constant Contact) with steps for that editor.
- In Mailchimp, drag a Code block into your email and paste. In Constant Contact, drag a Custom Code block into your layout and paste.
- Send yourself a test before you schedule the email.
In the dialog, Copy again copies the HTML again, and Download .html saves it as a file.
Gotchas
- Copy HTML stays off until the block holds at least one event or highlight.
- Only highlights are saved. Reloading or leaving the page resets your event picks, sections and style.
- The block's heading always reads "This Week on Vibemap", whatever the date range. To change it, edit the pasted block in your email editor.