Build and Share an Events Calendar
Turn one of your events lists into a calendar, then put it on your website or share its link.
A calendar reads its list directly. Past events roll off and new ones appear, with no reposting and no new code to paste.
Before you start
You need an events list. Create one under Lists first (Lists), or click New list inside the calendar builder.
The Calendars page
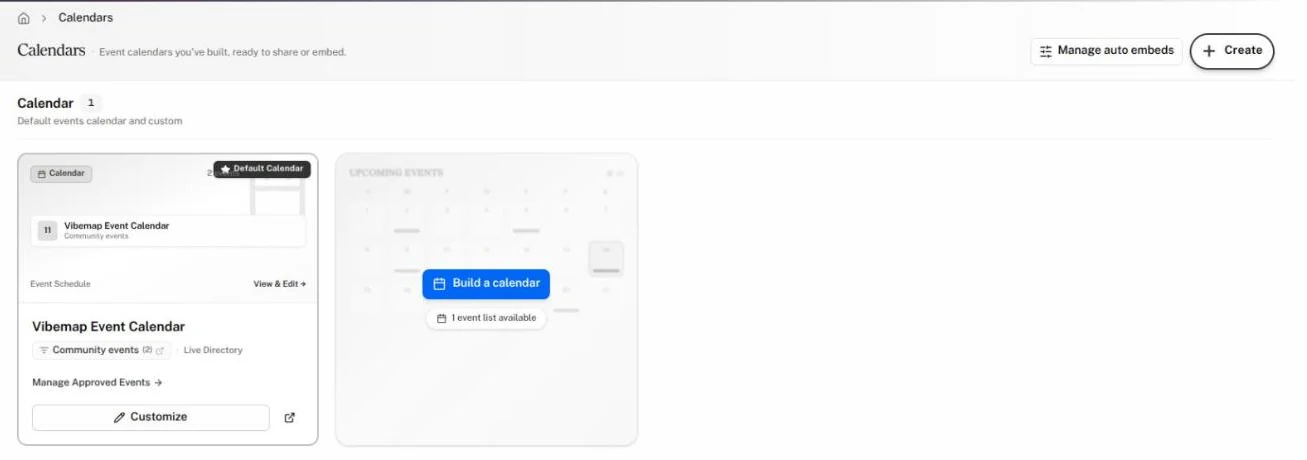
In the sidebar, click Calendars. The page shows every calendar your organization has built.
- Calendar: your default calendar and the ones you built, with their count.
- The Default Calendar is the calendar of your default events list. Until someone customizes it, the card reads Your organization Event Calendar and offers Customize. Its Manage Approved Events link opens your Events page.
- Each calendar you built shows its list and how many times its link was opened. It offers Edit, open, copy, archive and delete. They work as they do for maps: see The Maps page.
- The last card, Build a calendar, starts a new one.
- Calendars by Category: calendars generated for single categories, when your account has them. Click Show to open the shelf. Manage auto embeds, at the top right, chooses which ones exist. They work like maps by category.
Build a new calendar
-
On Calendars, click Build a calendar. (Or click Create, then Calendar.)
-
What kind of calendar? Pick a starting point:
- Community calendar: everything happening, with a month view, search and tag filters.
- Venue or museum program: one place's shows and exhibits, with descriptions and repeat dates.
- Festival or event series: a short run of events, with a map and "Happening now" badges.
Or click Or start from scratch. You can change any setting later.
-
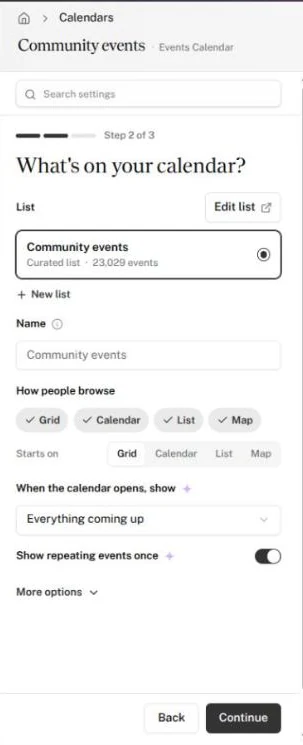
What's on your calendar?
- Under List, pick your events list.
- Under Name, type a name, or leave it blank to use the list's name. The calendar's link is made from this name and can't change once you publish.
- Under How people browse, turn on the views visitors get: Grid, Calendar (month), List (a day-by-day agenda) and Map. Keep at least one. With more than one on, choose which view the calendar Starts on.
- Under When the calendar opens, show, pick a starting date range, such as Everything coming up, This weekend or Next 7 days. Visitors can widen it.
- Turn on Show repeating events once to show a weekly or daily event as one card. The list view still shows every date.
- Click Continue.
-
How should it look?
- Colors and logo: pick your theme.
- Each event card shows: Categories, Vibes, Tags, Description.
- People can filter by: Search, Dates, Tags, Region. With none chosen, the calendar has no filter row.
Click More options for every other setting.
-
Click Publish calendar.
The panel reads Your calendar is live and shows the code for your website.
Put the calendar on your website
On the Your calendar is live panel:
- Under Code for, choose Website code (any website) or WordPress block (a WordPress site with the Vibemap plugin, where this calendar's list is synced).
- Click Copy the code (or Copy the block).
- Paste it on your page:
- WordPress, website code: edit the page, click +, add a Custom HTML block, paste, and update the page.
- WordPress block: edit the page, click an empty line and paste. Update the page.
- Squarespace, Wix and others: add an Embed or Code block, paste the website code and save.
The panel also offers:
- Height on your page, Someone else runs your website? and Just need a link?, as for maps. See Put the map on your website.
- Featured events carousel: a sliding row of event cards for your homepage. Click Copy carousel code or Copy link. Preview carousel opens it.
- Event submission form: lets venues and the public submit events. Click Copy form code or Copy link. Preview form opens it.
- Place submission form: lets venues and businesses submit places. Click Copy place form code or Copy link.
Click Keep editing to go back to the settings. To return to this panel later, click Add to your website.
For URL parameters and sizing details, your web developer can use the Embeds reference and Embedding and sizing.
Change a published calendar
- On Calendars, click Edit on the calendar's card.
- The panel shows Edit calendar and its topics: Events, Dates, Views and size, Colors and map style (Theme and style without the Map view), Cards, Filters, On phones and Extras. With the Map view on, Map behavior and Boundary and areas appear too. Click a topic to open it.
- Change what you need. The preview updates as you go.
Changes save to the live calendar on their own. The top bar reads Saving..., then All changes saved. The code and link you already shared show the change.
Search settings, click-to-edit on the preview, Try it and the phone preview work as they do for maps. See Change a published map.
Control dates and repeats
Open the Dates topic.
- When the calendar opens, show: the starting date range.
- Repeating and long events: Show repeating events once, Show day-after-day runs once, Show how often it repeats and Hide events longer than a day.
- Date badges: Timing badges, such as Happening Now, Tonight and This Weekend, and “Now” on events under way.
To show only some of a list's events, such as family events, open the Events topic and use Only show. With two or more picks in one group and When the filter applies set to Before loading, choose Any to keep events that match at least one, or All to keep events that match every one; each choice shows how many events it keeps. It works as it does for maps: see Show part of a list.