Build and Share a Map
Turn one of your places lists into an interactive map, then put it on your website or share its link.
A map reads its list directly. Add a place to the list and it appears on every map built from that list, with no new code to paste.
Before you start
You need a places list. Create one under Lists first (Build and Manage Lists), or click New list under List inside the map builder.
The Maps page
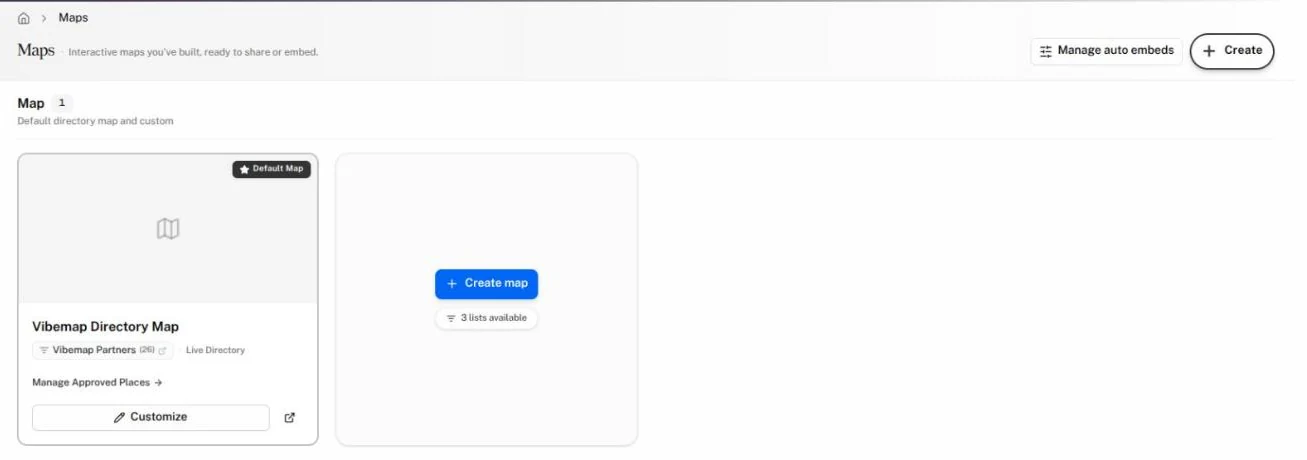
In the sidebar, click Maps. The page shows every map your organization has built, under Map.
- Default Map: the map of your default places list. Until someone customizes it, the card reads Your organization Directory Map and offers Customize. Its Manage Approved Places link opens your Places page.
- One card for each of your other maps, showing its list and how many times its link was opened.
- Create map: the last card. It starts a new map.
- Maps by Category: ready-made maps, when your account has them. Click Show to open the shelf. See Maps by category.
Each card you built has these buttons:
| Button | What it does |
|---|---|
| Edit (or click the picture) | Opens the map in the builder. |
| Open icon | Opens the live map in a new tab. |
| Copy icon (Make a copy of this map) | Copies the map and opens the copy. |
| Archive icon | Hides the map and turns off its public link. The list is not affected. The message that confirms it offers Undo. |
| Delete icon | Removes the map for good. Code and links you already shared stop working. The list is not affected. |
Build a new map
-
On Maps, click the Create map card. (Or click Create at the top right, then Map.)
-
What are you making? Pick a starting point:
- Business directory: shops, dining and services, with cards beside the map.
- Walking tour: numbered stops in order, and the visitor's own location.
- Public art and landmarks: big photo markers and photo-first cards.
- Printed map: numbered markers, a title bar and a QR code back to the live map.
Or click Or start from scratch. You can change any setting later.
-
What's on your map?
- Under List, pick your places list. Edit list opens it in a new tab.
- Under Name, type a name, or leave it blank to use the list's name. The map's link is made from this name and can't change once you publish.
- Under How people browse, turn Grid on or off. Map is always on. With both on, choose which view the map Starts on.
- Click Continue.
-
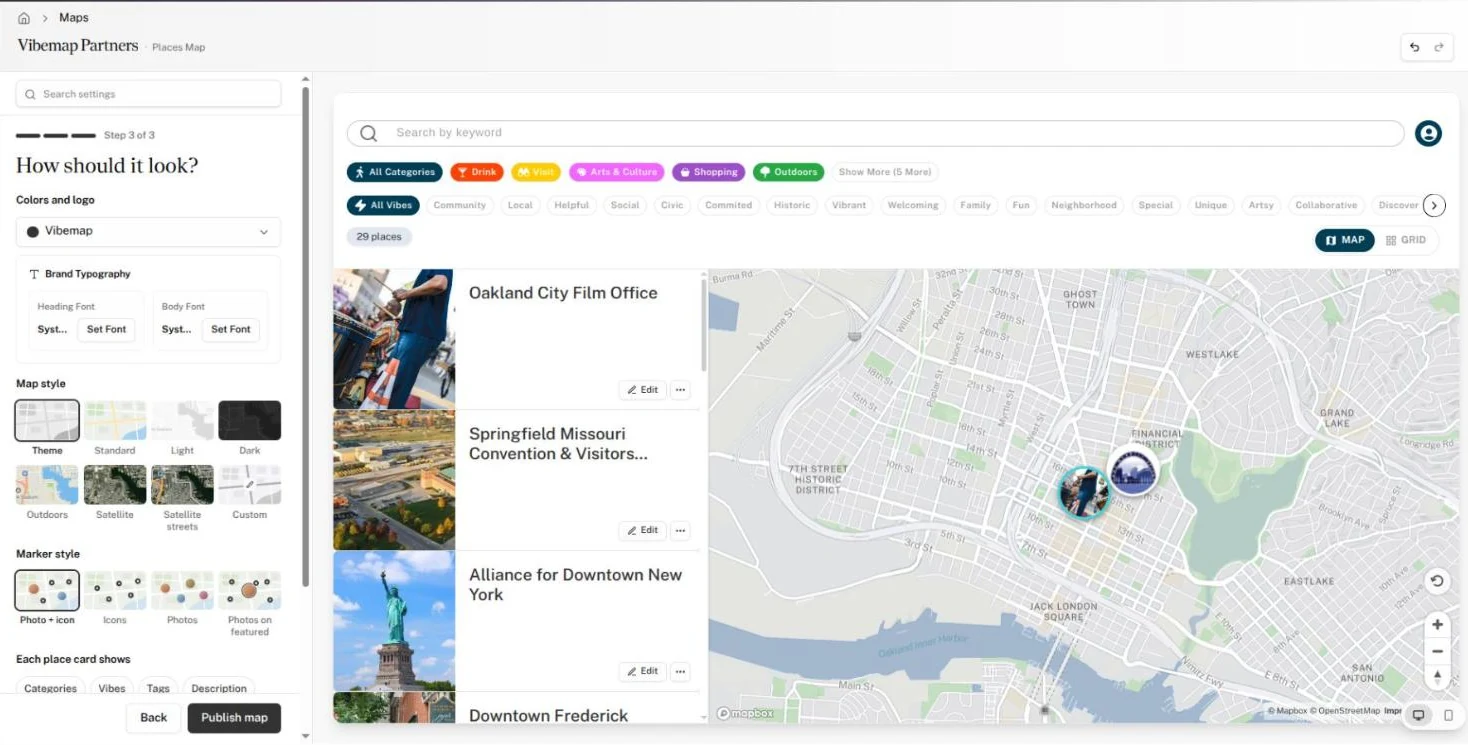
How should it look?
- Colors and logo: pick your theme.
- Map style: Theme, Standard, Light, Dark, Outdoors, Satellite, Satellite streets or Custom (paste a Mapbox style link).
- Marker style: Photo + icon, Icons, Photos or Photos on featured.
- Each place card shows: Categories, Vibes, Tags, Description, Tagline.
- People can filter by: Search, Categories, Vibes, Tags, Region. With none chosen, the map has no filter row.
Click More options for every other setting.
-
Click Publish map.
The panel reads Your map is live and shows the code for your website.
Put the map on your website
On the Your map is live panel:
- Under Code for, choose:
- Website code: works on any website.
- WordPress block: for a WordPress site with the Vibemap plugin, where this map's list is synced. The panel lists any settings the block doesn't carry yet.
- Click Copy the code (or Copy the block).
- Paste it on your page:
- WordPress, website code: edit the page, click +, add a Custom HTML block, paste, and update the page.
- WordPress block: edit the page, click an empty line and paste. WordPress turns it into the Vibemap block. Update the page.
- Squarespace, Wix and others: add an Embed or Code block, paste the website code and save.
The rest of the panel:
- Height on your page: a fixed height in pixels. Leave it empty for Auto.
- Someone else runs your website?: type their email and click Open in your email. They get the code and the steps above.
- Just need a link?: click Copy link for emails, social posts and QR codes.
- Print or export: click Open the map exporter. See Export a Map for Print and Design Tools.
Click Keep editing to go back to the settings. To return to this panel later, click Add to your website.
For URL parameters and sizing details, your web developer can use the Embeds reference and Embedding and sizing.
Change a published map
- On Maps, click Edit on the map's card.
- The panel shows Edit map and its topics: Places, Views and size, Colors and map style, Markers, Layers and Shapes, Cards, Filters, Map behavior, Boundary and areas, On phones and Extras. Click a topic to open it. Click Edit to go back.
- Change what you need. The preview updates as you go.
Changes save to the live map on their own. The top bar reads Saving..., then All changes saved. The code and link you already shared show the change.
To find a setting faster:
- Type in Search settings at the top of the panel.
- With Edit selected in the top bar, click any part of the preview. Its setting opens. Select Try it to use the preview as a visitor would.
- Switch between the computer and phone previews with the two buttons at the bottom right of the preview.
- Settings tagged Expert fine-tune details most maps don't need.
Undo and Redo sit at the top of the builder. Preview opens the live map in a new tab.
If you leave with changes the Hub hasn't saved, the builder asks you to confirm. Next time, it offers them back: You have unpublished changes to this map from a previous session. Click Restore them or Discard.
Show part of a list
To map only some of a list's places, such as restaurants:
- Open the Places topic.
- Under Only show, pick Categories, Vibes or Tags.
- Under When the filter applies, choose:
- Before loading: only matching places load, and visitors never see the rest.
- On the page: every place loads, then the filter applies. Visitors can clear it to see them all.
- With Before loading and two or more picks in one group, choose Any or All under that group. Any matches places with at least one pick; All requires every pick. Each button shows how many places it matches. Separate groups always combine.
If the list already filters by that kind of term, the builder asks you to narrow it in the list instead and offers Edit list.
Move markers
When a place sits in the wrong spot on your map, move its marker:
- In the builder, click a marker on the preview. A bar at the bottom names the place.
- Click Reposition Mode. (Or open Markers, and under Place locations click Enable.)
- Drag the markers to their new spots. The bar at the top counts them.
- Click Save N markers. Reset all drops the moves; Done leaves the mode.
The new spots save to the map's list, so every map built from that list uses them. The places' own records stay as they were. To undo one, select its marker under Place locations and click Reset Override.
Maps by category
Some accounts get ready-made maps, each one your default map narrowed to a few categories, vibes or tags. They sit in the Maps by Category shelf.
- Each one follows your default map. To change it, change your default map. Your default map is the newest map of your default places list with nothing under Only show.
- Click View to open one. The panel reads Follows your default map. To customize it, click Make an editable copy.
- The card's icons make a copy, copy the embed code, copy the public link, and open the live map.
To choose which maps you get:
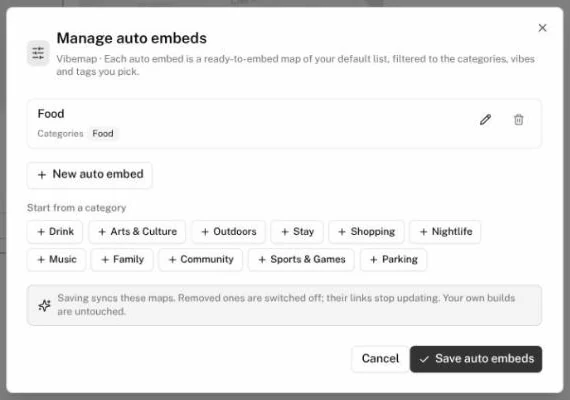
- At the top of the Maps page, click Manage auto embeds.
- Click New auto embed. Type a Name, then pick from Categories, Vibes and Tags. With two or more picks in one group, choose Any or All.
- Click Add. Or, under Start from a category, click a category to add a map of that category alone.
- Use the pencil to change an auto embed and the trash can to remove one.
- Click Save auto embeds.
Saving syncs the maps. Removed ones turn off, and their links stop updating. Maps you built yourself stay as they are.
Custom map parameters
Custom map parameters is off by default. Ask your Vibemap contact to turn it on for your organization.
It adds a Custom parameters box at the end of the Extras topic, in the map and calendar builders. Use it for embed parameters the builder has no setting for; your web developer can find them in the Embeds reference.
- Open Extras.
- Under Custom parameters, type one parameter per line, such as
showAddressOnCards=false, or join them with&. A whole embed link works too. - Click outside the box. The builder saves it and lists the parameters that will publish.
- A value here beats the builder's own setting. The box names each setting it replaces. The preview keeps showing the builder's value, so open the live map to check.
- The box ignores
list,type,theme,viewsanddefaultView. Set those with their own settings.
Without the feature, Extras tells you when Vibemap has set custom settings on a map and which settings they override. Ask your Vibemap contact to change them.